Why Use Oil Pastels?
Oil pastels are the versatile, dramatic medium suitable for all ages and classrooms. These pigmented sticks of wax and oil allow for the artist to create colorful works of art on many surfaces and with countless techniques. To make this medium more accessible, let’s explore some topics for using oil pastels. We will go over some basic tips, techniques, and classroom application ideas.
Tips for Using Oil Pastels
Because of their ‘messy’ nature and intimidating wide application use, oil pastels are either loved or avoided at all costs. So, let’s even that playing field and demystify these colorful sticks of possibilities.
First, set up your space. Oil pastels are suitable for any age and are non-toxic, but their composition can create messy fingers and work spaces. A good practice is to use a placemat under the artwork. This should be larger than the art-making surface. Newspaper works fine and fits most workspaces.
Second, you want to have some paper towel for your artists to wipe their fingers off on. They may be blending with their fingers or other tools and handling oil pastels without the paper wrapping. Having a paper towel handy can help keep things clean. This also helps avoid unintended smudges on the artwork from messy hands.
Special tip: Paper towels can also be used to wipe the tip of the oil pastels if they are cross-contaminated with other colors from storage and use.
Third, determine the right oil pastel for your artists. There are many brands out there that make great oil pastels. The key is to select the right one for your students. Consider the size of the oil pastel stick, the in/exclusion of the paper wrapper, and the color variety available.
Because oil pastels are often used with heavier pressure, they are usually held closer to the tip. Having a larger set of oil pastels for younger artists, allows them the grip needed to control the medium.
For older students, intermediate elementary and up, the crayon-sized regular options are great. Most oil pastels for classroom use do come with a paper wrapper like a crayon. This allows the artist to keep their hands cleaner and allow for the colors to be labeled. This paper can be peeled away as the oil pastel sticks become worn down from use. Some higher end oil pastels do not come with paper wrappers.
Last, the color variety. Having a large color palette to choose from will open up the opportunities for artists to blend colors and add more varied value. It also means the teacher will need to first teach these techniques and provide opportunities for students to practice and build more skills.
Finally, experiment and practice the oil pastels yourself first. Going through the process of learning the medium and playing with the various applications yourself, allows you the opportunity to determine best practices for your classroom and artists.
You will discover how to prepare your space for your setting, what clean up supplies and routines you would want available, and the steps and tips your students themselves might need as you problem solve first. If you have a specific lesson idea in mind, all the better to prepare for the lesson.
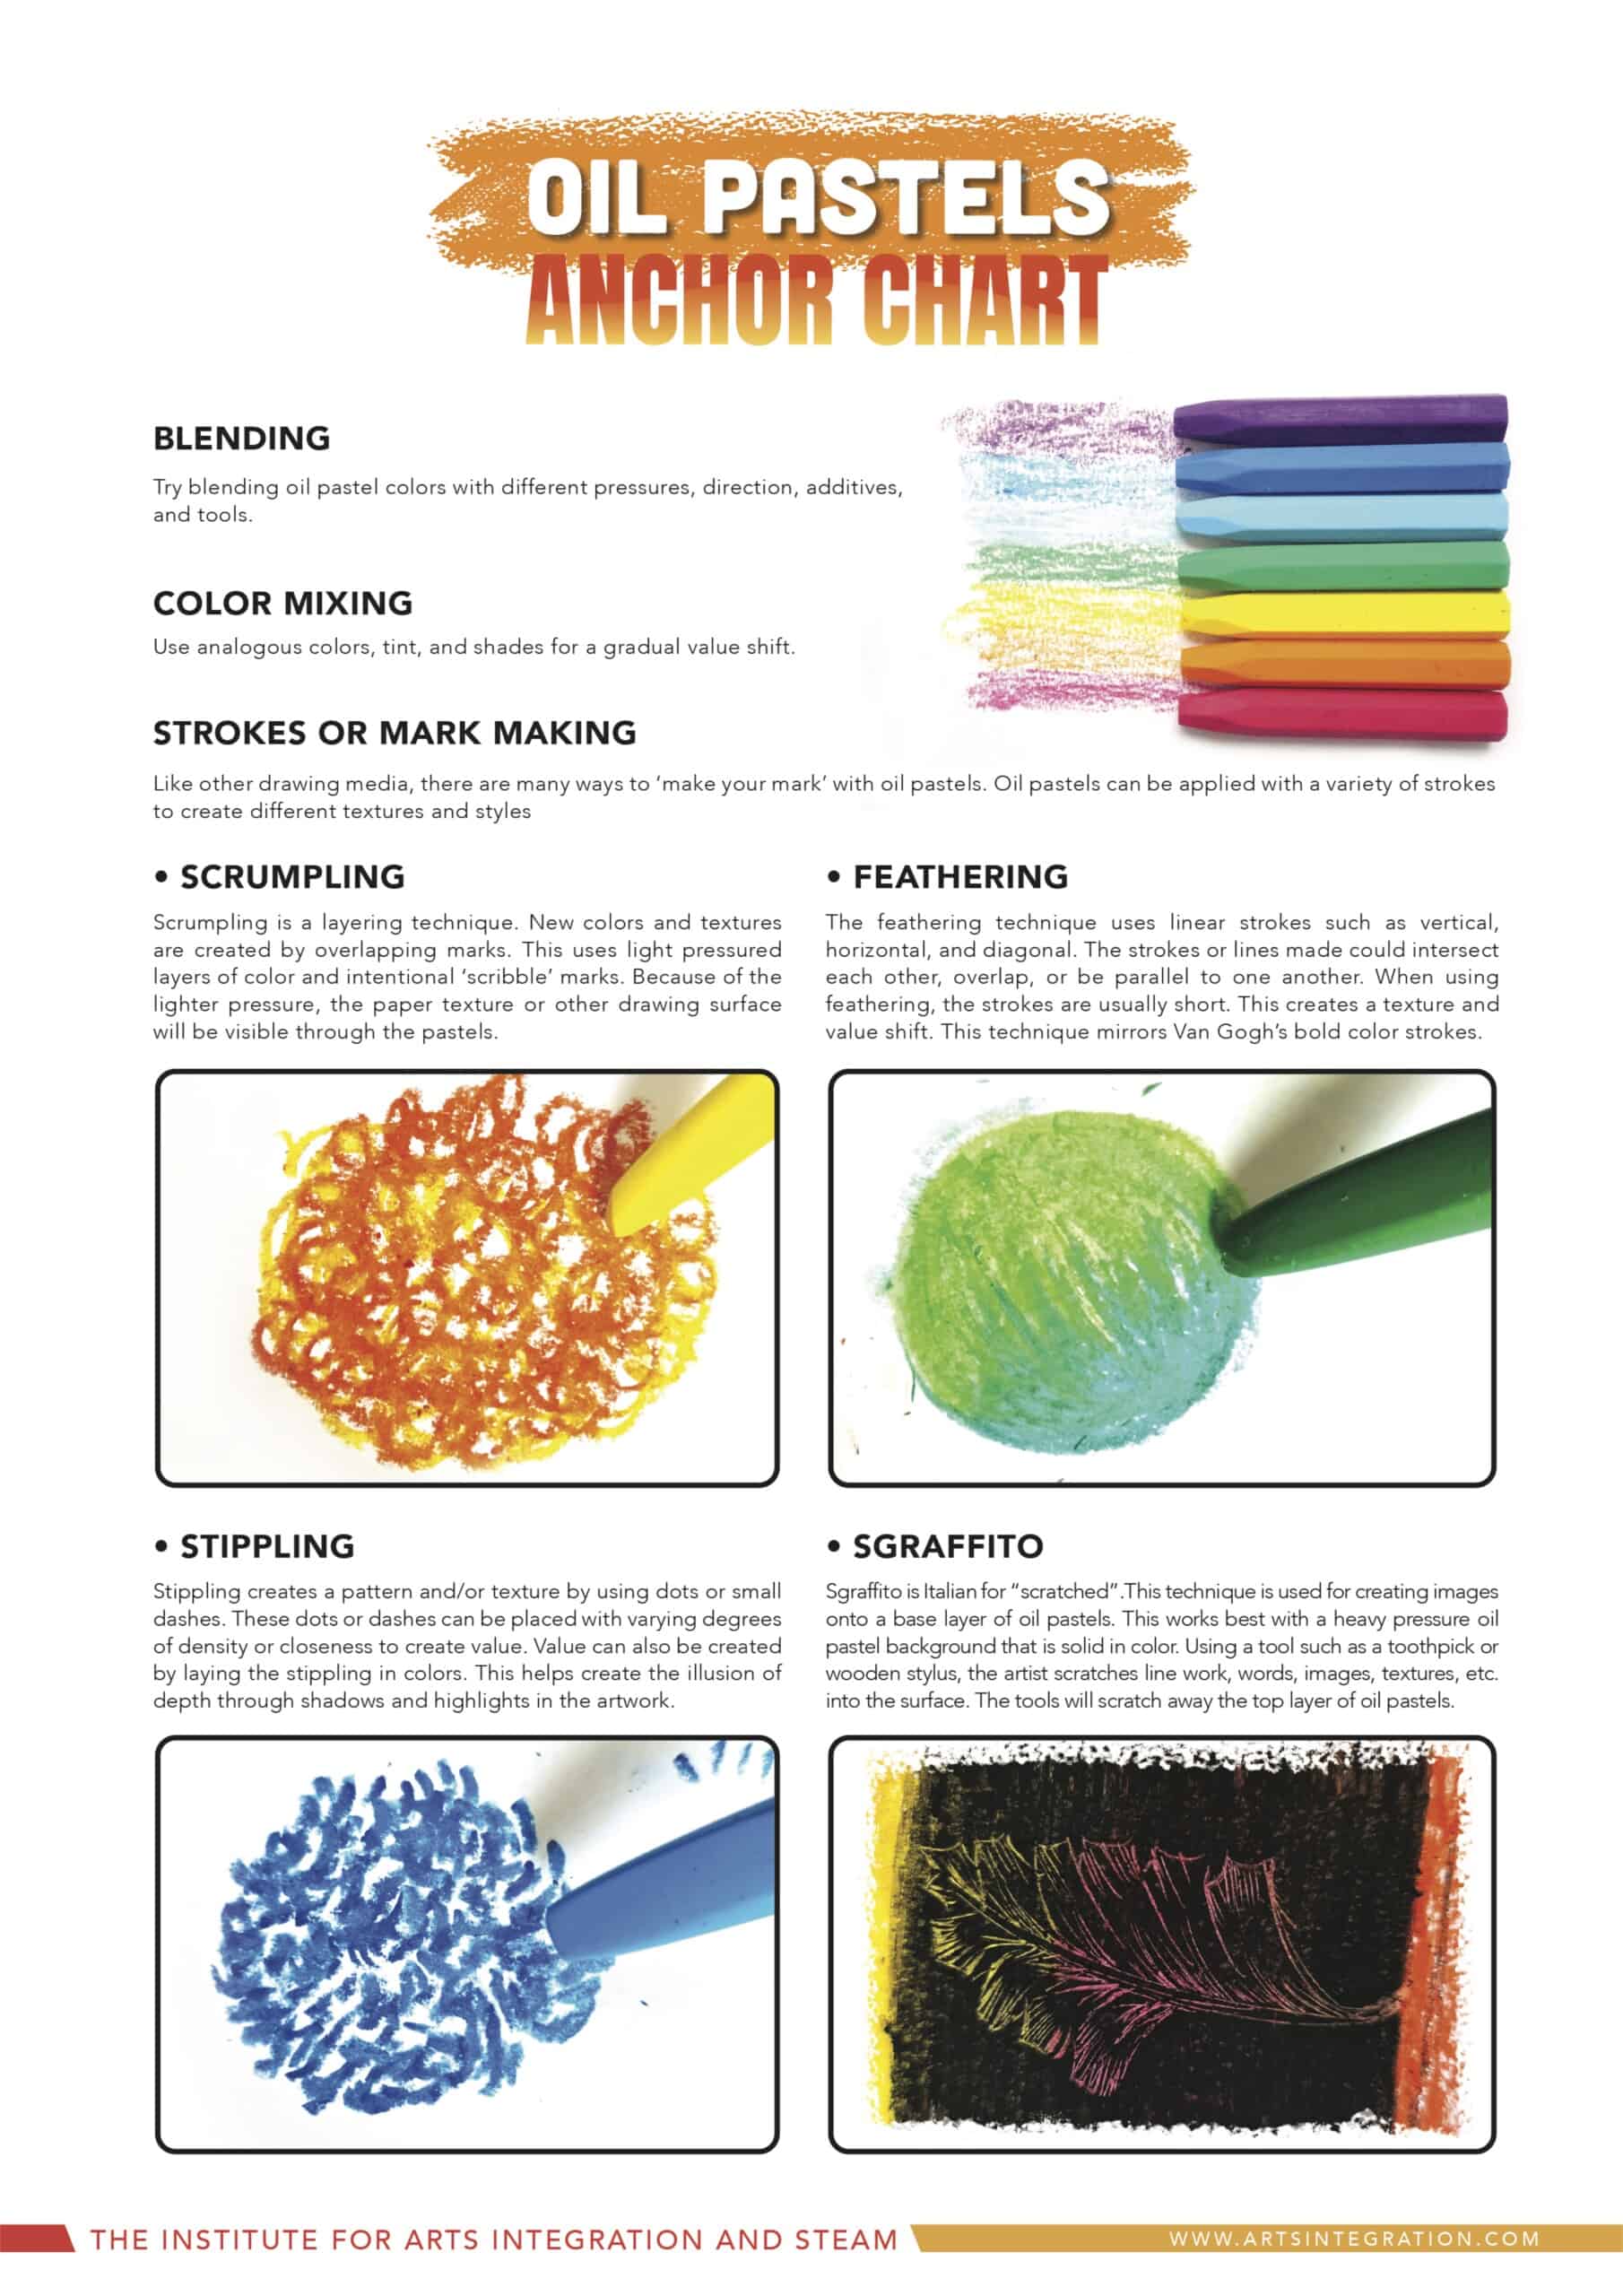
DOWNLOAD THIS OIL PASTELS ANCHOR CHART PDF
Tricks and Techniques for Using Oil Pastels
The oil in oil pastels allows for a uniquely creamy drawing medium. This attribute naturally lends itself to being a great art-making tool for learning blending and value techniques, as well as varied texture applications. This same creamy composition allows the oil pastels to be used on many surfaces such as paper, wood, metal, plastics, canvas, and even glass. For most classrooms, oil pastels are used on paper. For a more dramatic effect, use black or other dark colored paper.
Blending
Try blending oil pastel colors with different pressures, direction, additives, and tools.
- Pressure
A heavy-pressured color bend will create a bold, rich result. By working in a singular direction, apply consistent, heavy pressure with your oil pastel colors. The heavy pressure will blend the colors together as you overlap them. The overlapping of colors helps create a smooth transition. Using light pressure, you can blend your colors together by adding several, more transparent, layers. Lighter pressure, depending on your amount of layers, does tend to let more paper show through. This is not a bad thing if it is intended.
- Direction
Pay attention to the direction that you are coloring, drawing, or blending a color. For a more realistic look, work in the direction that your object is going. For example, if you are working on a vertical part of your drawing, such as the side of a building, apply your colors with vertical strokes. When blending with oil pastels, you can use vertical, horizontal, diagonal, and even circular blending and stroke techniques. For circular blending, use small circles of color that overlap the last layer of color.
- Addictives
Using baby oil or vegetable oil on a cotton swab over your oil pastels can create an even and ultra smooth blend. This technique works best with a heavier oil pastel application and requires the work to dry when finished. This could be used to simulate smooth surfaces in a drawing like glass or metal.
- Tools
There are many tools that can be used instead of your fingers for blending the colors in oil pastels. Some common tools used are q-tips, cotton swabs, kneaded erasers, cloth scraps, dry brushes, and tortillions, or blending stumps. Pay attention to the direction of your work while using a tool. In most cases, the small circular blending works well with the softer blending materials.
Color Mixing
Use analogous colors, tint, and shades for a gradual value shift. Analogous colors are groups of three colors that are next to each other on the color wheel. Tints are a color mixed with white to create lighter tones. Shades are the opposite; a color mixed with black to create a darker tone. With heavy pressure, colors will mix and bleed without much more needed to finalize the effect. With light pressured oil pastel use, colors are created by the effect of layering colors on top of one another. If sharp highlights or shadows are desired, you can add these details last on top of your colors.
Strokes or Mark Making
Like other drawing media, there are many ways to ‘make your mark’ with oil pastels. Oil pastels can be applied with a variety of strokes to create different textures and styles.
- Scrumpling
Scrumpling is a layering technique. New colors and textures are created by overlapping marks. This uses light pressured layers of color and intentional ‘scribble’ marks. Because of the lighter pressure, the paper texture or other drawing surface will be visible through the pastels.
- Feathering
The feathering technique uses linear strokes such as vertical, horizontal, and diagonal. The strokes or lines made could intersect each other, overlap, or be parallel to one another. When using feathering, the strokes are usually short. This creates a texture and value shift. This technique mirrors Van Gogh’s bold color strokes.
- Stippling
Stippling creates a pattern and/or texture by using dots or small dashes. These dots or dashes can be placed with varying degrees of density or closeness to create value. Value can also be created by laying the stippling in colors. This helps create the illusion of depth through shadows and highlights in the artwork.
- Sgraffito
Sgraffito is Italian for “scratched”.This technique is used for creating images onto a base layer of oil pastels. This works best with a heavy pressure oil pastel background that is solid in color. Using a tool such as a toothpick or wooden stylus, the artist scratches line work, words, images, textures, etc. into the surface. The tools will scratch away the top layer of oil pastels.
Classroom Applications
Once the techniques and skills for using oil pastels are explored and learned, the classroom applications can be blended with other learning. This can take the form of expression, visualization, and study, to name a few.
The high contrast and realistic value that can be created with the blending techniques, lends itself to many form studies and scientific drawing ideas. The varied stroke techniques allow for the simulated texture drawing of surfaces and materials, especially with animals that have fur and feathers.
There are many resources out there with lesson ideas for visual arts alone and many that also deal with cross-content applications.
The Institute for Arts Integration and STEAM has several resources including a video on techniques and a lesson plan on Wayne Thiebauld’s Cakes involving math and visual arts.
Other resources can come from blogs and art making supply companies such as Sax: School Specialty and Blick Art Materials. These two companies in particular, have worked to create a plethora of visual art lessons for educators. Their lesson plans list the materials needed to execute the lesson as well as sequenced directions.
Sax has recently worked to complete a set of lesson plans that incorporate the National Core Art Standards and ideas for integrating art across the curriculum. A quick search through their resource revealed several ideas for using oil pastels.
In the 2021 lesson plan set from Sax there is a great lesson using oil pastels called ‘Shrink Art Sampler’. This lesson explores art and science by having students recreate art from master painters, then experimenting with different mediums on shrink film.
Blick has a great introductory lesson plan for oil pastels that explores art and literacy through the work of Jean Arp. students work to create an art piece that expresses randomness and control.
These resources offer a great starting point, but don’t let them limit you and your ideas for your classroom. Through your own exploration and practice of oil pastels, you can begin to design learning for your students that best fits their needs.


