
3 Ways to Teach 1-Point Perspective
7 Min Read • Arts Integration
I have spoken to many art teachers over the years who hate, loathe, or despise teaching perspective drawing. It is more constrained than we are used to. There is a correct and incorrect way to do it which often seems limiting and not as creative as we all want to be. Teaching perspective can often seem boring or so sterile that it is difficult for teachers to get totally jazzed up about it. It can be difficult to expand upon a structured principle, like perspective, in creative ways, but I believe that it is important to try. One way to do this is by adding choice.
I have a confession: I love teaching perspective! Here is why…
- It is simple once you break it down into easy steps
- The result is impressive with a little effort
- Once you know the rules, it can be applied to anything you draw
- It makes your drawing look more realistic
- It touches upon many Elements of Art: Line, Space, Value, Shape, and Form
- It offers an opportunity for advanced students to challenge themselves by learning two-point perspective, three-point perspective, or above.
- It uses mathematical concepts like parallel lines, shapes, forms, measuring, and use of tools
- Students love it!
Breaking It All Down… Start with One-Point Perspective
Begin with one-point perspective. It is the easiest to teach and to learn. Once you have an understanding of one-point perspective, then you can expand into more complex concepts.
In order to draw in perspective, you need 1 or 2 things: a vanishing point and a horizon line.
- Vanishing Point: The place where something moves so far away from your view that it just vanishes. If it is a road, with parallel lines, it is finally where they vanish creating the illusion of them intersecting.
- Horizon Line: Represents the viewer’s eye level or where the sky meets the water or land. When inside, it could be where the wall meets the floor.
3 Basic One Point Perspective Designs: The Bird’s Eye Buildings, Landscape, and Room
There are 3 specific designs that I teach my students using one-point perspective. After they have learned these 3 designs, we look at examples of how other artists have used these basic concepts and have added their own creativity to the process. Students then create a work of art of their own using one of the designs covered and their art supply or process of choice.
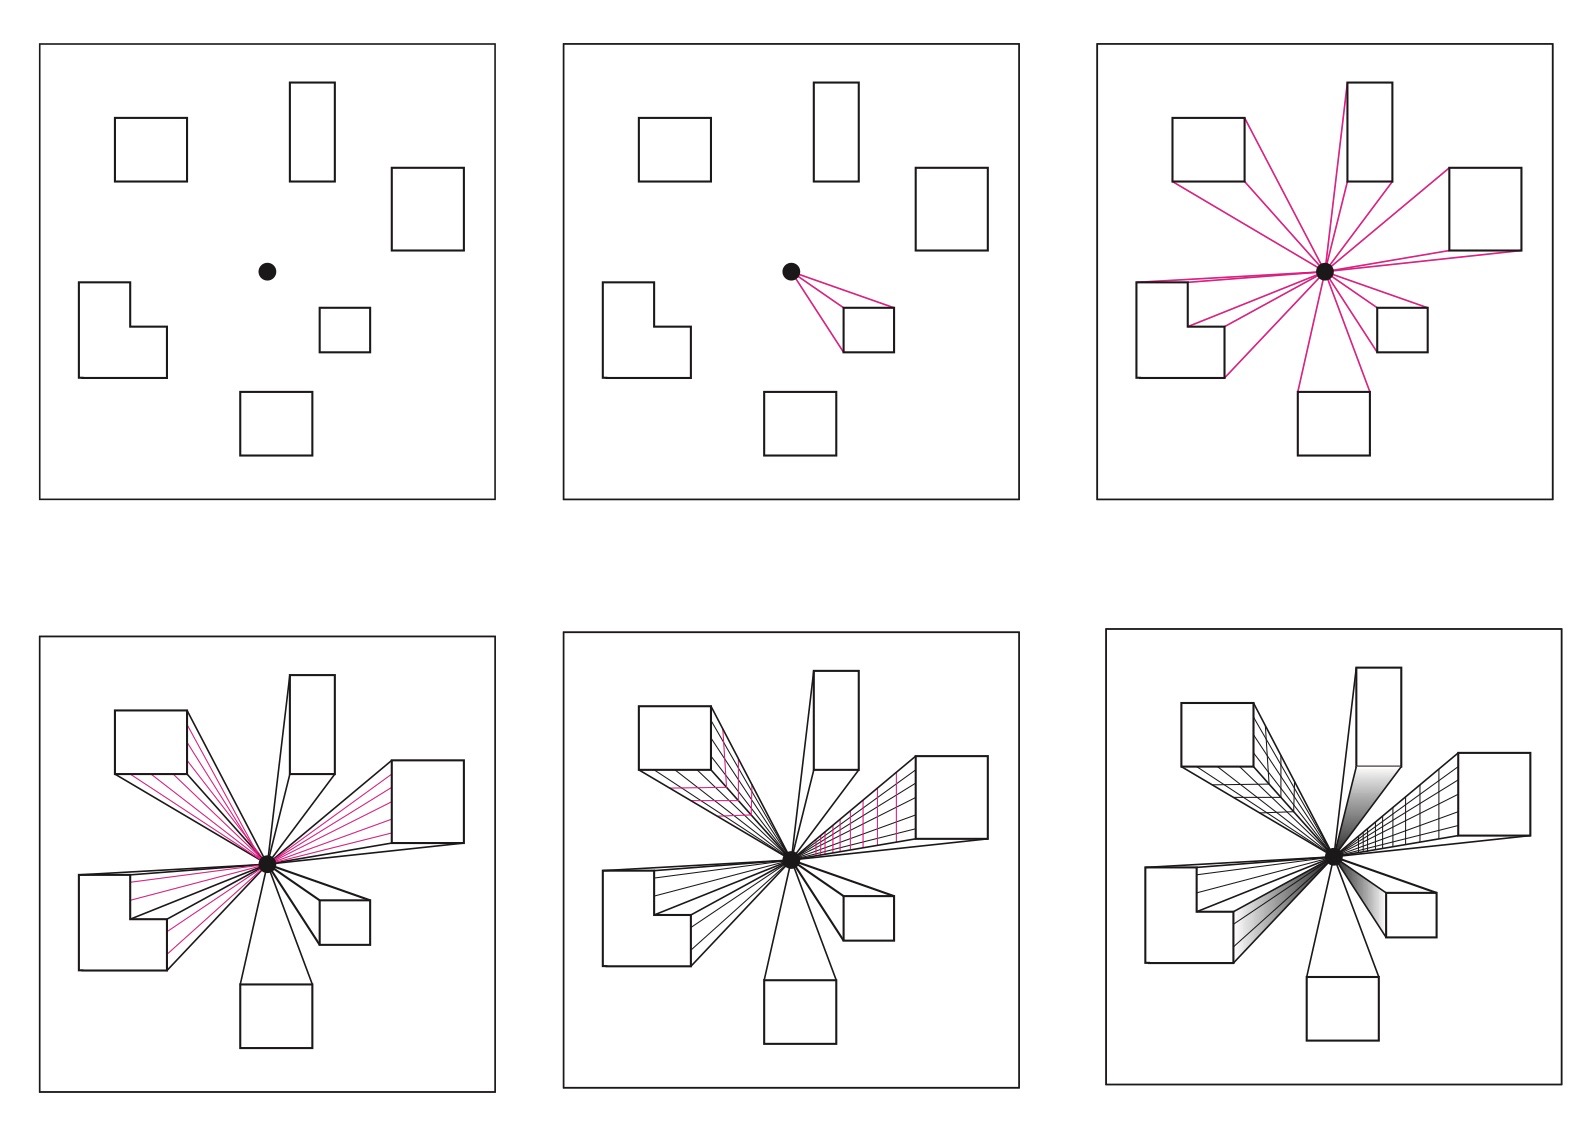
The Bird’s Eye Buildings:
I use this design first because all you need is a vanishing point. Add squares and rectangles around the vanishing point in the center of the paper.
Begin with the square or rectangle closest to the vanishing point. Draw tangent lines from the corners of the square to the vanishing point.
- Because these are solid objects, if you run into a building while drawing, stop.
- Repeat these steps until all the shapes are in one-point perspective.
- Add lines going down the sides of the buildings.
- All vertical lines go to the vanishing point.
- All horizontal lines are parallel to the tops of the building
- Add shading, or value, to your buildings. The darker values will be closer to the vanishing point.
- The original shapes will be the tops of the buildings, so you can add objects, like pools or helicopter pads as if you are looking at them from above. For example, a pool would look like a rectangle.
- Try making an “L” shape in perspective. Does it change the process? Do you add more lines to the vanishing point?
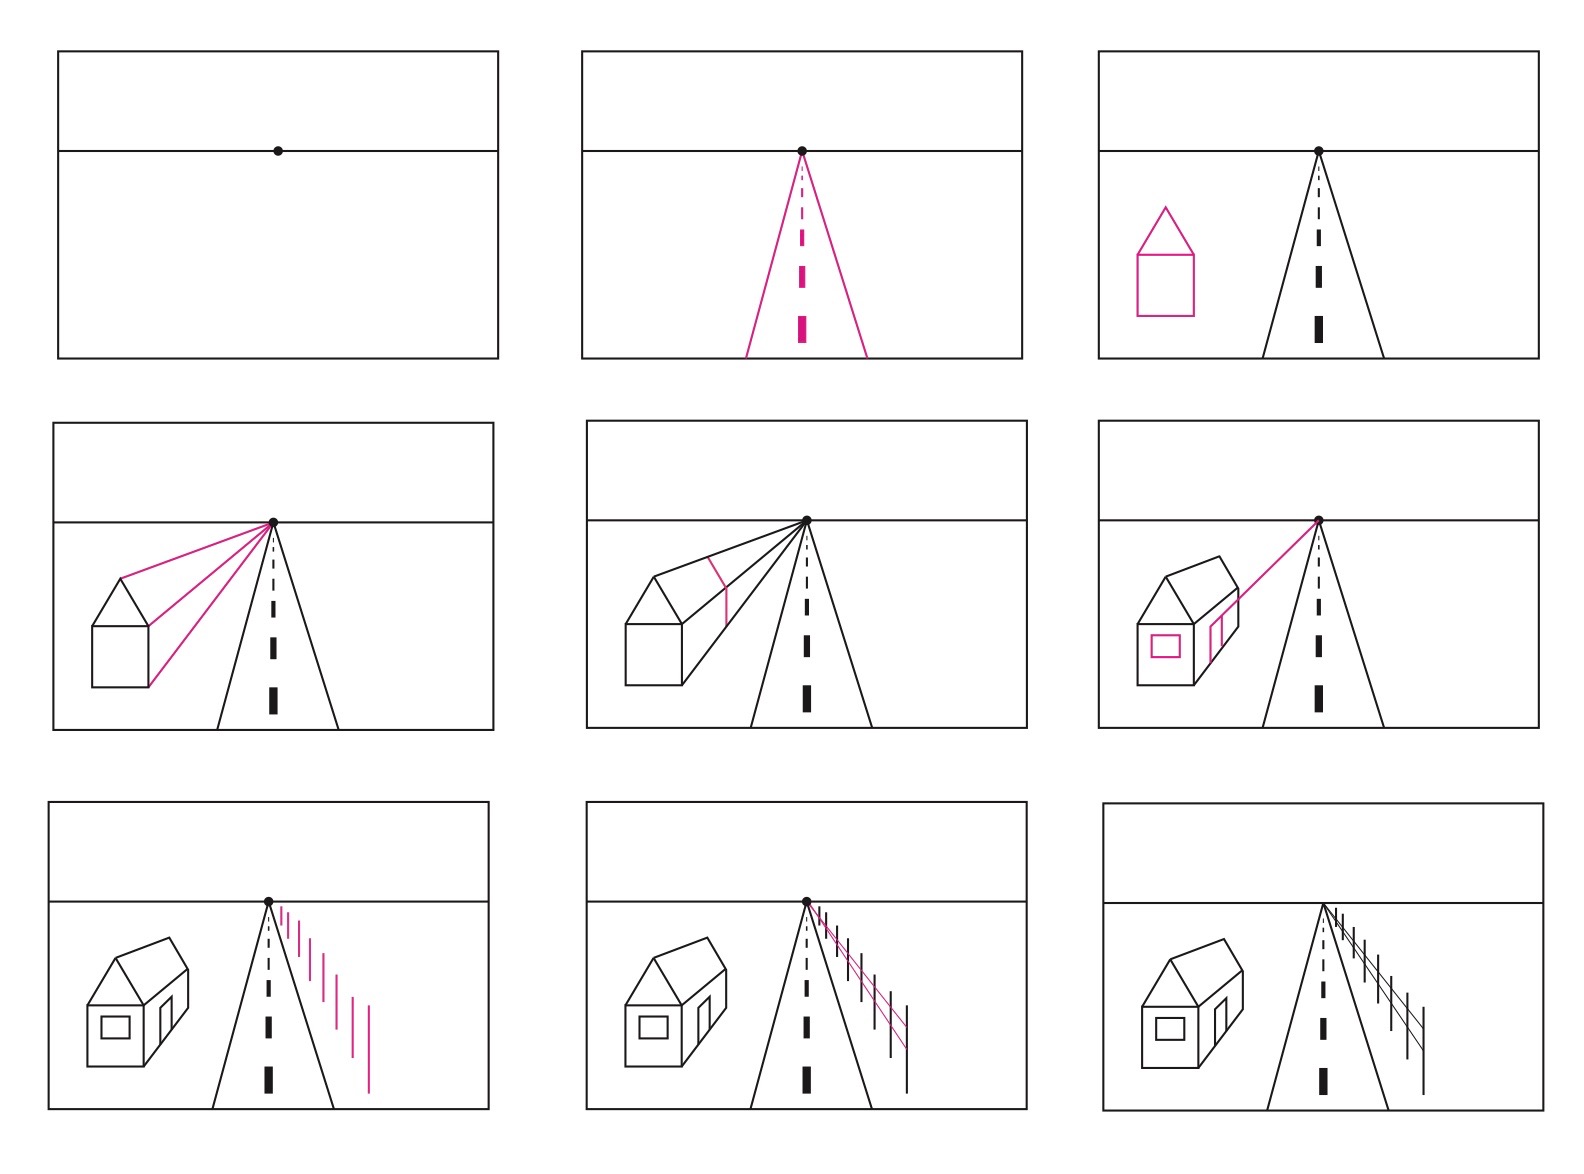
The Landscape:
Set this up on a plain piece of paper. Drawn a horizontal line across the top third of the paper. In the middle place a vanishing point.
- To make a road, lines should start at the bottom of the page and meet at the vanishing point.
- Dividing lines in the road should be larger and further apart when they are lower on the paper and get smaller and closer together as they reach the vanishing point.
- Houses start with squares and rectangles and their sides should go to the vanishing point. They should then be cut down using right angles.
- Try overlapping the shapes.
- Street lights, fences, or power lines should be parallel to the edge of the paper, or straight up and down. These should also gradually get shorter and closer together as they reach the vanishing point. If they have lines attaching the poles together, like a fence or power lines, the horizontal portions of those objects should go toward the vanishing point.
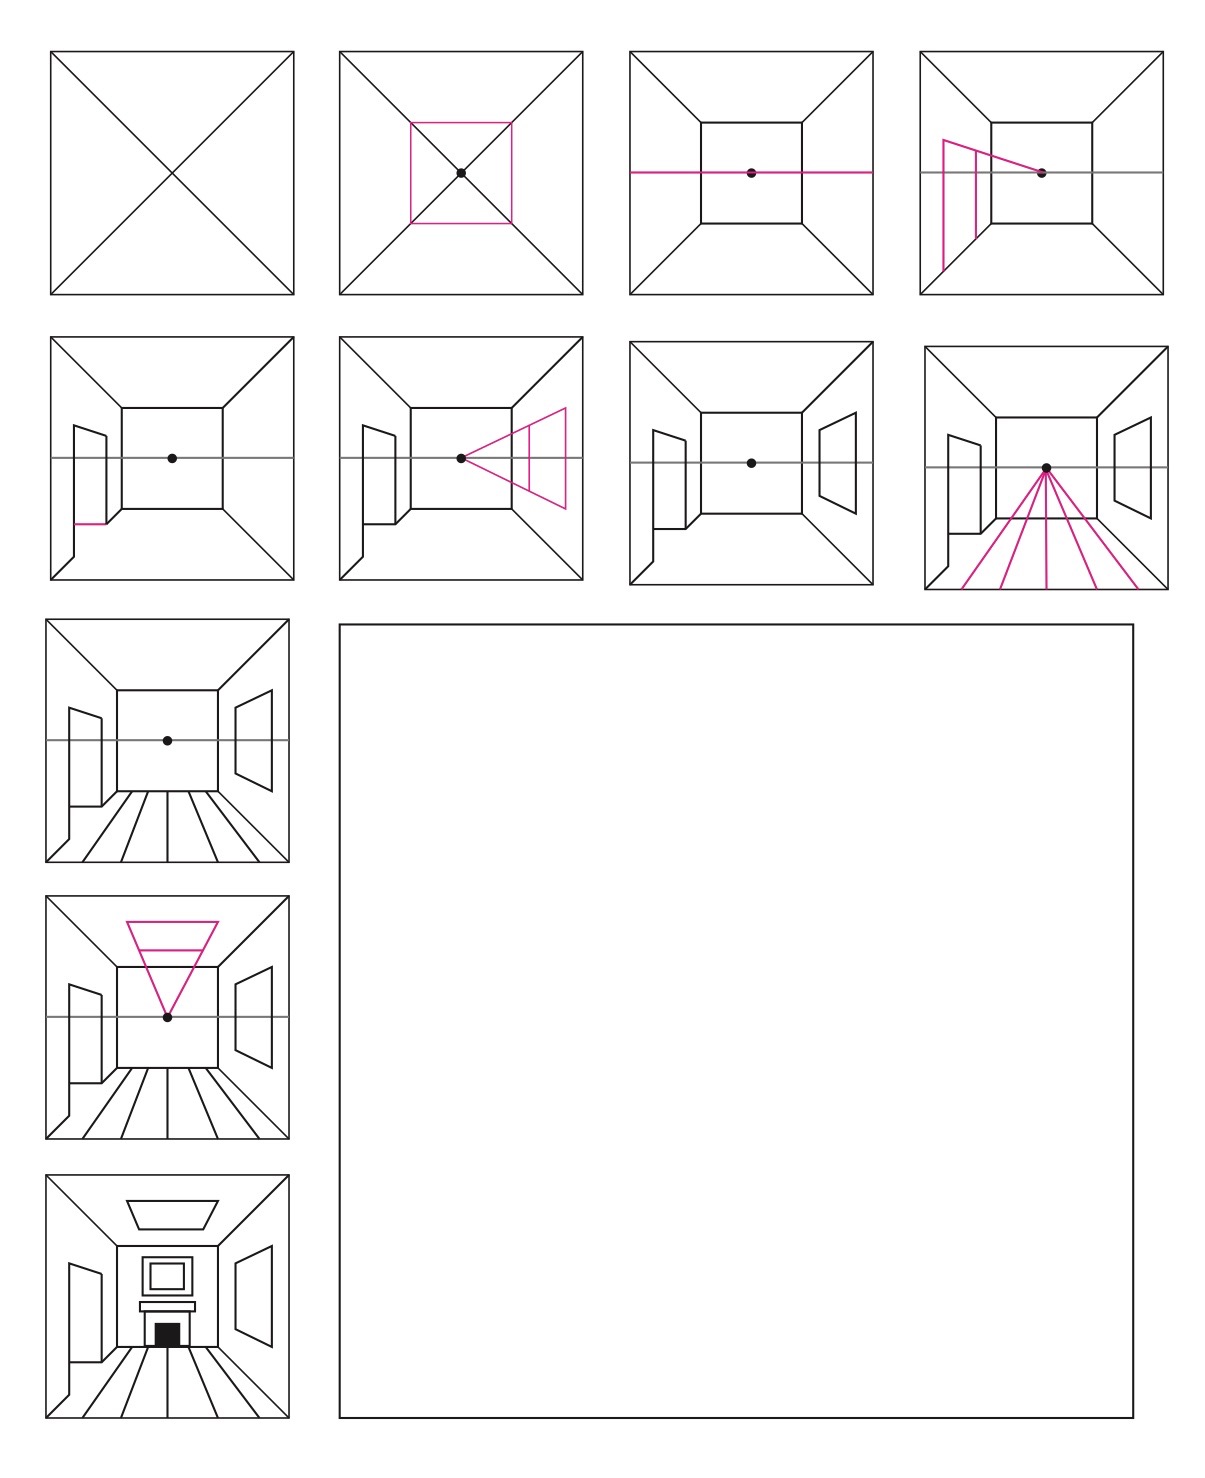
The Room:
The middle square or rectangle represents the back of the room or hallway. Whatever you draw on that square should appear as if you are looking directly at it. Those objects will not need the vanishing point.
- Everything on the walls, ceiling, or floor will line up to the vanishing point.
- Anything below the horizon line will include lines moving up toward the vanishing point.
- Anything above the horizon line will include lines moving down toward the vanishing point.
- Vertical Lines should be parallel to the edge of the paper or straight up and down.
- Horizontal Lines use the vanishing point to keep them in perspective.
Once students have experience with each of these lessons, look at some examples of artwork in one-point perspective with a variety of subject matter and using different art techniques or supplies. Look at photographs, paintings, collage, colorful and black and white artwork.
Have students pick a design and create an original work of art using the concepts. Adding choice to your classroom allows for automatic buy-in for students wanting to expand upon ideas and problem solve using their own creativity. The only thing is, it must show understanding of one-point perspective. The rest is up to them!
Tips and Tricks
- Everyone, no matter how long you have been drawing, will make mistakes. It is essential to tell your students this because there will be frustrated faces out there. It is ok. Failure equals learning. Our eyes can trick our brains sometimes, like optical illusions, and that is normal. We are going to try to rewire our thinking using basic “rules.”
- Place worksheets into clear plastic covers. Use dry erase markers to draw the designs in perspective. When the students complete one of the steps, have them hold up their drawings. This is an easy way to assess and erase, so students can make sure to get it right before they move on.
- “Draw Light Until You Know It’s Right.” Drawing lightly at first will make it easier to erase. It is a difficult thing for students to remember, so let them know that they will be erasing in the beginning of the lesson.
- Do the “Ruler Scoot.” Line up the ruler to the existing line that you want your new line to be parallel to… then nudge your ruler up or down from there, keeping the ruler aligned to the original.
- Ask yourself what you are really assessing and provide assistance with the extra skills like rectangles and squares. If you are asking them to master the concept of one-point perspective and not measuring the sides of a square, then provide students with square templates to make that process move faster and easier.
Possible Extensions
- There are many different designs to begin with and many resources out there with directions. Find what works for you.
- Try making a composition that shows all three designs in different sections of the paper. How would they interact?
- Add 3D elements like superheroes flying over the one-point perspective buildings.
- Take pictures of the students and have them add themselves to their artwork.
- Create a Surrealist work of art by adding a dream-like quality. Draw objects that do not usually go together in the same space. Link your lesson with an artist like Salvador Dali.

Though many teachers grumble when perspective time comes along, the experience can be enjoyable. Using these 3 ways to teach 1-point perspective and allowing students to make choices, can energize your curriculum and make it a more enjoyable way to teach one of the most important concepts in art and math.

